Download and Install the Arduino IDE

If you are new to all of this and have never used the Arduino IDE (Integrated Development Environment) then you should head over to the Arduino website and follow their guide to downloading and installing it.
Arduino IDE Download and Setup Guide (opens on the Arduino website)
Download the EX-CommandStation Software from ‘therailsnail’ GitHub
Having downloaded and installed the Arduino IDE, the next step is to download the software from ‘therailsnail’ GitHub with the config.h file pre-configured and a mySetup.h configuration file added and tailored for the Railsnail EX-CommandStation USB, WiFi and Bluetooth models.
- Download the software zip file from:-
Railsnail GitHub Software zip file Download.
(Note that this software is identical to the official DCC-EX 4.0.0 Prod download except that it has the config file copied from config.example.h and a customised mySetup.h configuration added).
OR
Download the Software from the Official DCC-EX GitHub
Alternatively, the Released Revision of the software may be downloaded directly from the official DCC++ GitHub software zip file download page but will not incorporate the above changes).
DCC-EX latest versions of software may be downloaded from https://github.com/DCC-EX/CommandStation-EX/tags. Beware these versions may cause issues. Use with caution!
Setup the Arduino COM Port and Board Type
To enable selection of the Board Type and COM port in the Arduino IDE:-
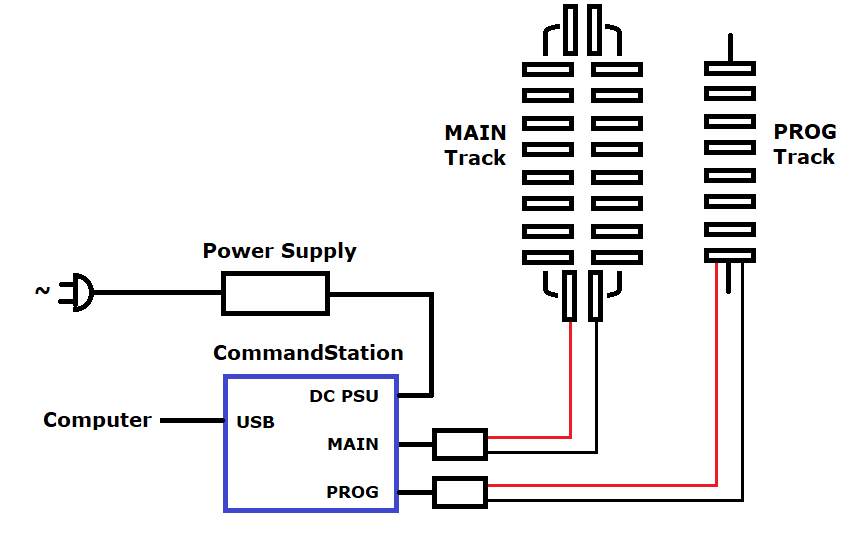
- USB and WiFi Version EX-CommandStation:- Connect a USB cable from your computer’s USB port to the CommandStation’s USB socket. (A USB Type B cable is required).
- Bluetooth Version EX-CommandStation (Windows PC):- Assuming the PC has been configured with a USB Serial COM Port over Bluetooth device (see Bluetooth COM Port Configuration), then a physical USB cable is NOT required when compiling/uploading new sketches to the Arduino Mega2560. Just ensure that the Bluetooth COM Port is setup within the Arduino IDE (see below).
See the below CommandStation connection diagram below.
(At this stage, it is NOT recommended that connections are made to the MAIN and PROG tracks).
Select Board Type
Configure the IDE’s Board Type (see below picture):-
- Click the menu item ‘Tools’ in the Arduino IDE, then select ‘Arduino AVR Boards‘ from the dropdown menu under Board:
- Also, select ‘ATmega2560 (ATMega 2560)‘ from the Processor: dropdown menu

COM Port Selection
Configure the IDE’s COM Port (see above picture):-
USB/WiFi Version CommandStation with Genuine Mega2560 Boards: – For genuine Arduino Mega2560s, select ‘COMxx (Arduino Mega or Mega 2560)’ from the Port: dropdown menu.
See below picture (LH) showing the location of the USB Communications chip on a typical Genuine Mega2560 (or newer clone).
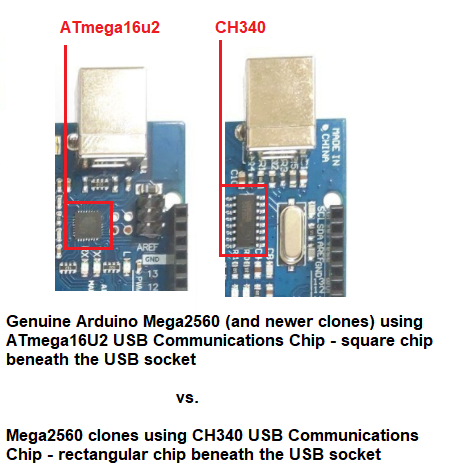
- USB/WiFi Version CommandStation with Clone Mega2560 Boards: – Some Mega2560 clones use the CH340 serial communications chip (see above). These may need a driver installed before the COM port may be detected by your computer’s operating system.
Once the driver is installed, the Clone Mega2560 boards USB ports will be listed in Device Manager – Ports (COM&LPT) as USB-Serial CH340(COMxx). Use this Port in the IDE’s dropdown list.
- Bluetooth CommandStation Version: – Set the COM Port to be the Bluetooth COM Port from the IDE’s dropdown list.
Unzip the Software and Compile it in the Arduino IDE
Having downloaded the software as a zip file (earlier), we need to unzip the software and place it in the Arduino IDE ‘Sketchbook location’ (see below picture)
The ‘sketchbook location’ is found in the Arduino IDE by clicking ‘File’ on the IDE menu then clicking ‘Preferences’ – the ‘Sketchbook location’ will be displayed.
The default location for Arduino sketches (for the Windows OS) is a folder named Arduino located in the user’s Documents folder.
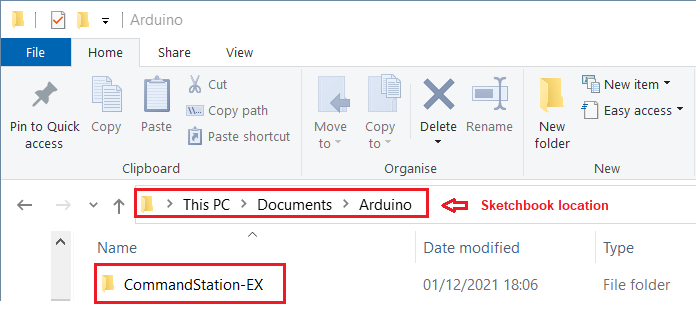
Opening the CommandStation-EX folder lists all of the software that we will later compile and load into the CommandStation.
So, opening the folder we see…
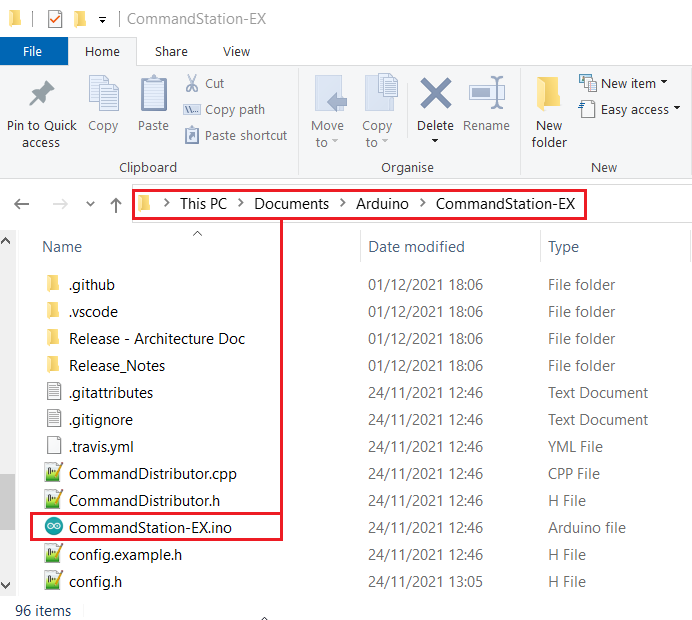
Notice that the above listing shows the CommandStation-EX.ino file located in the CommandStation-EX folder.
Compile Software and Upload to the CommandStation
We are now close to being able to compile the software and upload it to the CommandStation as we have:-
- Configured the Arduino IDE with the Board Type Arduino Mega2560 (Tools menu)
- Connected the CommandStation via USB and configured the COM Port within the IDE (Tools menu)
- Downloaded the software zip file (with the mySetup.h addition)
- Unzipped the software into the correct location within the IDE (Sketchbook location)
Next, we load the sketch into the Arduino IDE. Click ‘File’ (on the menu bar) then select CommandStation-EX from the ‘Sketchbook’ dropdown menu. (See below picture)
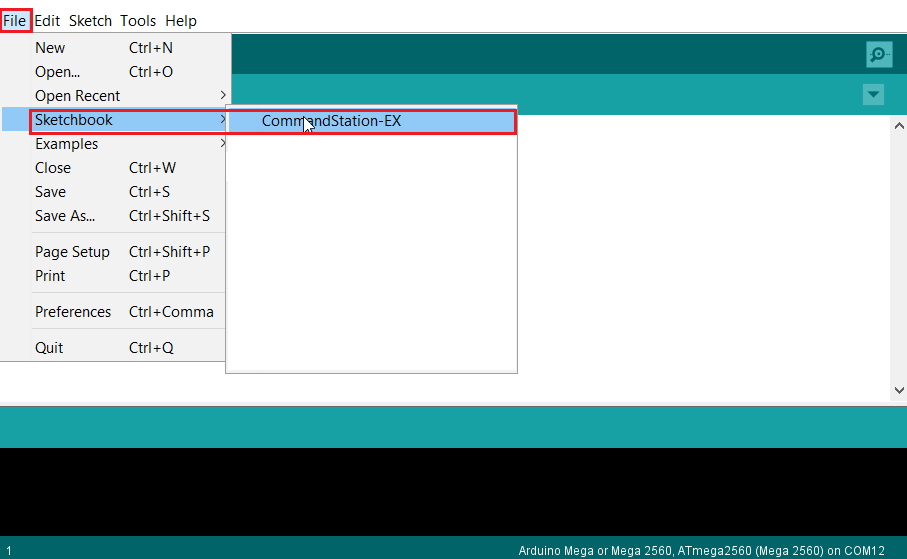
The sketch will load and populate the IDE screen
Next, click the ‘Upload’ icon, (see below picture), and observe the IDE reports ‘Compiling sketch…’
The status of the compilation process is reported in the status area shown and progress is indicated with the green progress bar.
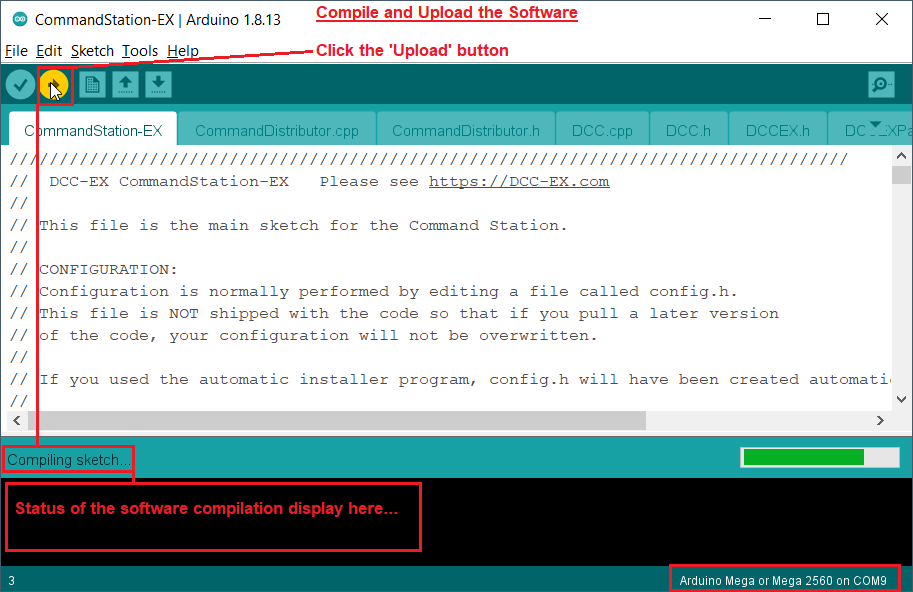
Following an error-free compilation process, the IDE will immediately upload the compiled software to the CommandStation. Note that it will attempt to upload on COM port 9 in the above picture.
The upload process is displayed…
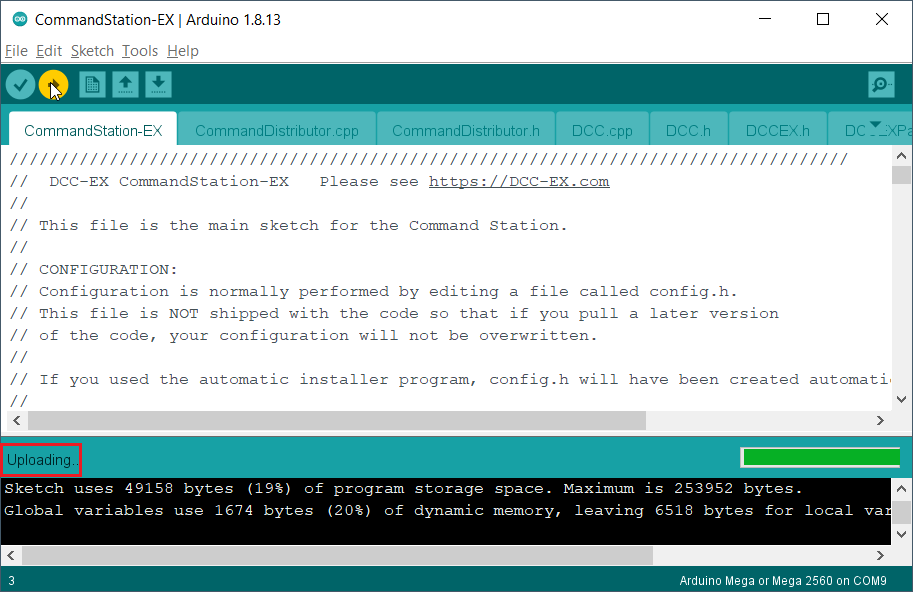
Notice Uploading… is displayed and the green progress bar may be monitored as the software uploads.
After successfully uploading, the IDE status should change to ‘Done uploading’, the green progress bar disappears and the status area should not report any errors. The below picture shows that the upload was successful and reports on CommandStation sketch memory usage.
If your upload reports something similar, then all went well!

To check that the sketch uploaded and the Mega2560 is running the software, we can connect to the Arduino serial monitor by clicking the ‘Serial Monitor’ button…
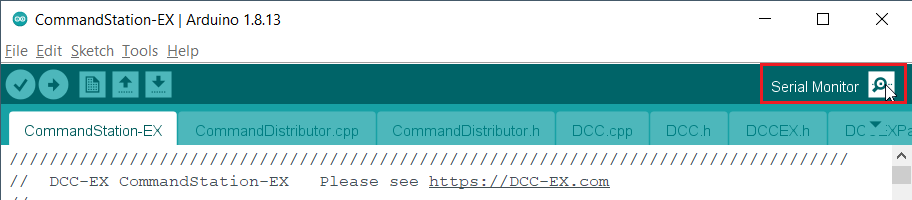
This opens a new ‘Serial Monitor’ window…

Notice the Serial Monitor is set to ‘Both NL&CR and the Baud rate is set to 115200.
CommandStation startup information is displayed in the monitor window. We can also do a quick check to ensure that the CommandStation is receiving data on its USB port by entering the command <s> (not the lower-case s), then clicking ‘Send’
The <s> command returns the line commencing <iDCC-EX V….
which displays the version number of the sketch (V-3.2.0 rc4) and also the processor is a MEGA with an Arduino Motor Shield.
ADVANCED – More on the mySetup.h Configuration File
Okay, so now we have set up the Arduino IDE, downloaded CommandStation software and carried out some basic tests.
At this stage, the CommandStation is operational, can be connected to the main and programme tracks and Throttle software configured to control it.
So where does the mySetup.h file mentioned earlier fit into all of this?
Well, this file can be used to customise the CommandStation every time it is powered on…
For WiFi versions of the CommandStation the WiFi Access Point (AP), Station (STA) SSID and passwords may be set up and stored here.
Also, for all versions of the CommandStation, ACK settings (affecting reading and writing DCC CVs) may be changed to suit non NMRA compliant DCC controllers.
Therefore, this one file can contain all customisations relevant to a specific setup with all of those commands commented for easier maintenance at a later date.
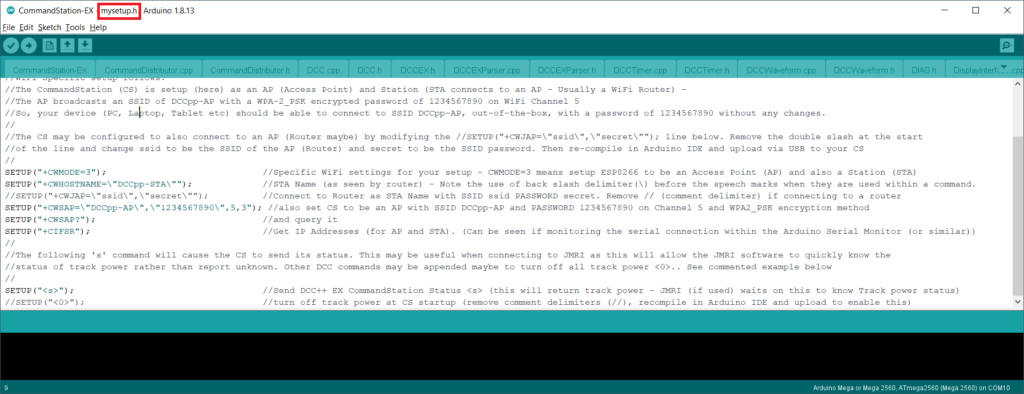
So, if you have downloaded the software from the official DCC-EX site, then you will need to create this file as it is not part of the official DCC-EX Software release.
Let’s create a mySetup.h file and populate it with some configuration settings and commands:-
Click the down arrow icon located on the sketch tabs bar – a dropdown menu appears – click on New Tab (see below)
A yellow dialog box appears requesting ‘Name for New File’.
Enter mySetup.h (exactly a shown with the uppercase S) – then click OK
This creates a new file within the CommandStation-EX sketchbook named mySetup.h and a new empty tab is created in the IDE

Copy the ‘code block’ below and paste it into the currently empty mySetup.h tab
Customise it to your own requirements, then compile and upload the modified sketch to your Mega as described above.
Having uploaded the modified sketch containing mySetup.h commands, every time the CommandStation restarts then the commands within mySetup.h will be executed.
Note that you should refer to the official DCC-EX Command Reference for a detailed description of the commands.
//ACK Settings for Hornby TTS. These may need tweaking, but are usually good to go
SETUP("<D ACK MIN 2000>");
SETUP("<D ACK MAX 8750>");
SETUP("<D ACK LIMIT 20>");
//
//WiFi Specific setup follows:-
//The CommandStation (CS) is setup (here) as an AP (Access Point) and Station (STA connects to an AP - Usually a WiFi Router) -
//The AP broadcasts an SSID of DCCpp-AP with a WPA-2_PSK encrypted password of 1234567890 on WiFi Channel 5
//So, your device (PC, Laptop, Tablet etc) should be able to connect to SSID DCCpp-AP, out-of-the-box, with a password of 1234567890 without any changes.
//
//The CS may be configured to also connect to an AP (Router maybe) by modifying the //SETUP("+CWJAP=\"ssid\",\"secret\""); line below. Remove the double slash at the start
//of the line and change ssid to be the SSID of the AP (Router) and secret to be the SSID password. Then re-compile in Arduino IDE and upload via USB to your CS
//
SETUP("+CWMODE=3");                             //Specific WiFi settings for your setup - CWMODE=3 means setup ESP8266 to be an Access Point (AP) and also a Station (STA)
SETUP("+CWHOSTNAME=\"DCCpp-STA\"");             //STA Name (as seen by router) - Note the use of back slash delimiter(\) before the speech marks when they are used within a command.
//SETUP("+CWJAP=\"ssid\",\"secret\"");          //Connect to Router as STA Name with SSID ssid PASSWORD secret. Remove // (comment delimiter) if connecting to a router
SETUP("+CWSAP=\"DCCpp-AP\",\"1234567890\",5,3"); //also set CS to be an AP with SSID DCCpp-AP and PASSWORD 1234567890 on Channel 5 and WPA2_PSK encryption method
SETUP("+CWSAP?");                               //and query it
SETUP("+CIFSR");                                //Get IP Addresses (for AP and STA). (Can be seen if monitoring the serial connection within the Arduino Serial Monitor (or similar))
//
//The following 's' command will cause the CS to send its status. This may be useful when connecting to JMRI as this will allow the JMRI software to quickly know the
//status of track power rather than report unknown. Other DCC commands may be appended maybe to turn off all track power <0>.. See commented example below
//
SETUP("<s>");                                   //Send DCC++ EX CommandStation Status <s> (this will return track power - JMRI (if used) waits on this to know Track power status)
//SETUP("<0>");                                 //turn off track power at CS startup (remove comment delimiters (//), recompile in Arduino IDE and upload to enable this)
mySetup.h – Q&A’s
Q. What are the // bits in the mySetup.h file?
A. These are comment delimiters. Anything on a line following the // characters are ignored when the CommandStation restarts. Use these to comment your commands.
Q. I do not understand what to change in mySetup.h – I want to set up my WiFi Version CommandStation to connect to my router. My router’s SSID is dlink_4422 and my router’s wireless password is ro56v&tTKrp
A. Okay it looks complicated due to all the quotation marks. But in mySetup.h simply change the line that reads:-
//SETUP(“+CWJAP=\”ssid\”,\”secret\””); //Connect to Router as STA Name with SSID ssid PASSWORD secret. Remove // (comment delimiter) if connecting to a router
to be:-
SETUP(“+CWJAP=\”dlink_4422\”,\” ro56v&tTKrp\””); //Connect to Router as STA Name with SSID ssid PASSWORD secret. Remove // (comment delimiter) if connecting to a router
Notice that the original ssid has been replaced by the router SSID dlink_4422 and secret has been replaced by the router’s password ro56v&tTKrp. The characters that require changing are highlighted in red. Do not delete any of the quotation marks as these are important!
Also notice, the double slash characters have been deleted from the start of the line else it will be treated as a comment and ignored when the CommandStation starts!
Now, in the Arduino IDE, compile and upload the changes to your CS
The CS should now connect to the router each time it starts.
Q. I’m confused. How do I change the Access Point (AP) WiFi settings for my CS? I would rather see it broadcast an SSID of RailAP with a password class31
A. In mySetup.h simply change the line that reads:-
SETUP(“+CWSAP=\”DCCpp-AP\”,\”1234567890\”,5,3″); //also set CS to be an AP with SSID DCCpp-AP and PASSWORD 1234567890 on Channel 5 and WPA2_PSK encryption method
to be:-
SETUP(“+CWSAP=\”RailAP\”,\”class31\”,5,3″); //also set CS to be an AP with SSID RailAP and PASSWORD class31 on Channel 5 and WPA2_PSK encryption method 3
Notice that DCCpp-AP has been replaced by the new AP SSID RailAP and the old password 1234567890 has been replaced by the AP’s new password class31. Wifi channel 5 is still in use and the Wifi encryption method remains WPA2_PSK.
Now, in the Arduino IDE, compile and upload the changes to your CS
Q. What does SETUP(“<s>”); do and why use it?
A. According to DCC++ Command Reference <s> RETURNS: Track power status, Version, Microcontroller type, Motor Shield type, build number, and then any defined turnouts, outputs, or sensors.
It will also immediately return track power status to JMRI (if used to control the CommandStation) thus causing JMRI to report track power status instead of reporting ‘power status unknown’ while waiting for an update from the CS. This JMRI behaviour appears to be fixed in version 4.26.
(Note for Bluetooth EX-CommandStation (only): I have observed that JMRI software on a Windows PC may still report CS Power Status Unknown for up to around 1 minute when connecting to the virtual COM port on Bluetooth CommandStations). Eventually, JMRI updates the Power Button with the CS Power status and everything works. This appears to be fixed in JMRI version 4.26!